이전 포스팅에 이이서 알림을 내가 정한 시간에 보내도록 해보자.
1. notification.dart 파일 수정
이전 포스팅에서 올렸던 notification.dart파일을 수정한다. (전체 코드는 맨 아래에 있다)
import 'package:timezone/timezone.dart' as tz;
import 'package:timezone/data/latest.dart' as tz;
두 패키지를 import한다. timezone은 지역에 따른 시간을 설정할 때 사용되고 timezone/data/latest 는 timezone 함수에 인자로 들어갈 지역에 대한 정보를 담고 있다.
initNotification 마지막 부분에 다음 두 줄을 추가한다.
tz.initializeTimeZones();
tz.setLocalLocation(tz.getLocation('Asia/Seoul'));
timezone을 초기화 하고, 지역을 서울로 지정한다.
그 다음 showNotification 함수를 수정한다.
showNotification() async {
  await flutterLocalNotificationsPlugin.zonedSchedule(
    0, //알림 id
    '알림 제목',
    '알림 내용',
    makeDate(18, 30, 0),
    NotificationDetails(
        android: AndroidNotificationDetails('channelId', 'channelName')),
    uiLocalNotificationDateInterpretation:
        UILocalNotificationDateInterpretation.absoluteTime,
    androidAllowWhileIdle: true,
  );
}

makeDate(h, m, s) {
  var now = tz.TZDateTime.now(tz.local);
  var when = tz.TZDateTime(tz.local, now.year, now.month, now.day, h, m, s);
  if (when.isBefore(now)) {
    return when.add(Duration(days: 1));
  } else {
    return when;
  }
}
알림 id, 제목, 내용 , 채널 id, name은 본인의 마음대로 지정하면 된다. 알림 제목과 내용이 사용자에게 직접적으로 보여질 내용이다.
makeDate라는 함수를 추가했는데, 이는 내가 인수로 지정한 h, m, s 즉, 시간,분,초에 맞게 알림을 보낼 날짜와 시간을 반환해주는 함수이다.
알림이 만약 알림을 보낼 시간이 현재 시간보다 이전이라면 다음날 정해진 시간 데이터를 반환하고, 알림을 보낼 시간이 아직 지나지 않았다면 같은 날 정해진 시간 데이터를 반환한다.
2. main.dart에 알림 초기화 함수, 알림 보내는 함수 실행
main.dart파일은 이전에 포스팅한 글과 다른 점이 없다. main함수에서 실행하는 첫 위젯의 initState 함수에 initNotification을 추가한다. 그리고 build함수의 원하는 위치에 showNotification을 실행하면 정해진 시각에 알림을 보낸다. (나는 floatingActionButton의 onPressed에 추가했다)

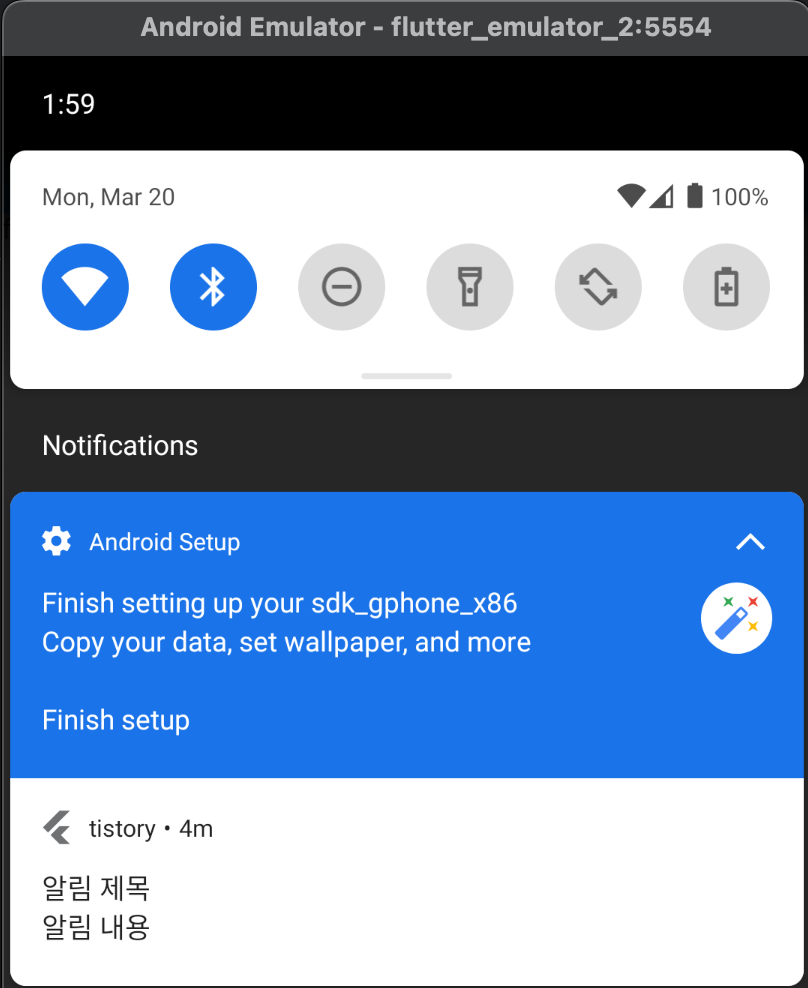
시간을 13시 54분으로 지정했는데 시간에 맞춰서 알림이 잘 전송됐다.
notification.dart 파일
import 'package:flutter_local_notifications/flutter_local_notifications.dart';
import 'package:timezone/timezone.dart' as tz;
import 'package:timezone/data/latest.dart' as tz;

FlutterLocalNotificationsPlugin flutterLocalNotificationsPlugin =
    FlutterLocalNotificationsPlugin();

initNotification() {
  const AndroidInitializationSettings initializationSettingsAndroid =
      AndroidInitializationSettings('@mipmap/ic_launcher');

  final InitializationSettings initializationSettings = InitializationSettings(
    android: initializationSettingsAndroid,
  );

  flutterLocalNotificationsPlugin.initialize(initializationSettings);

  tz.initializeTimeZones();
  tz.setLocalLocation(tz.getLocation('Asia/Seoul'));
}

showNotification() async {
  await flutterLocalNotificationsPlugin.zonedSchedule(
    0, //알림 id
    '알림 제목',
    '알림 내용',
    makeDate(13, 54, 0),
    NotificationDetails(
        android: AndroidNotificationDetails('channelId', 'channelName')),
    uiLocalNotificationDateInterpretation:
        UILocalNotificationDateInterpretation.absoluteTime,
    androidAllowWhileIdle: true,
  );
}

makeDate(h, m, s) {
  var now = tz.TZDateTime.now(tz.local);
  var when = tz.TZDateTime(tz.local, now.year, now.month, now.day, h, m, s);
  if (when.isBefore(now)) {
    return when.add(Duration(days: 1));
  } else {
    return when;
  }
}
main.dart파일
import 'package:flutter/material.dart';
import 'package:flutter_local_notifications/flutter_local_notifications.dart';
import '../notification.dart';

void main() {
  runApp(MaterialApp(
    home: MyApp(),
  ));
}

class MyApp extends StatefulWidget {
  const MyApp({super.key});

  @override
  State<MyApp> createState() => _MyAppState();
}

class _MyAppState extends State<MyApp> {
  @override
  void initState() {
    super.initState();
    initNotification();
  }

  @override
  Widget build(BuildContext context) {
    return Scaffold(
      floatingActionButton: FloatingActionButton(
        onPressed: () async {
          await flutterLocalNotificationsPlugin
              .resolvePlatformSpecificImplementation<
                  AndroidFlutterLocalNotificationsPlugin>()
              ?.requestPermission();
          showNotification();
        },
      ),
      appBar: AppBar(
        title: Text('notification'),
      ),
      body: Text('flutter local nofitication example'),
    );
  }
}
데이터 사용이 필요하지 않은 앱을 만들고 있는 중인데, 서버 없이 알림을 보내는 게 불편하고 조작하기 쉽지않았다. 서버가 있다면 미리 설계한 알림 외에도 다른 알림도 보낼 수 있을테고 알림을 보내는 과정이 더 간편할 것 같다는 생각이 들었다. 차근차근 서버도 공부해가며 새로운 걸 시도해봐야겠다.
'플러터' 카테고리의 다른 글
| [플러터] 자신의 'One Thing(단 하나)'를 관리해주는 앱을 개발했습니다! (0) | 2023.03.31 |
|---|---|
| [플러터] local notifications 플러그인으로 알람 보내기(안드로이드 버전) (0) | 2023.03.19 |